
by Shelley | English/Language Arts, Novel Studies, Organization
Some of my most vivid childhood memories of school were the novel studies I read for various subjects. It was my favorite way to learn skills, history, and any topic! I love books, and being allowed to read an entire book from cover to cover as a school assignment put me in heaven! I am sure this is a major reason why, as a teacher, my passion is to create and teach novel studies! I love introducing new books to my class, and as a community, being immersed in the book together. I love it when a student pulls us off the schedule with a question or comment from something they read and leads the class into a lively discussion. That’s where the real memorable learning takes place, after all!
I create novel studies more than any other product line simply because I like to focus on what I love. I want to work with my passion! I often get questions from readers asking how I would set up novel studies in my classroom. I decided to write a small series explaining my methods. For the most part, my novel studies include comprehension questions, vocabulary/grammar skill work, extension activities, and assessments.
Today’s post, part 3, deals with pacing the novel study. You can read part 1 and part 2 here.
 Novel Studies Part 3: Pacing
One of the challenges of using novel studies in the classroom is finding the time. It’s a balance between not moving too fast and not letting the unit drag on for too long because we all know you have a million other things to squeeze into your curriculum!

Each of my complete novel studies includes detailed daily teacher lesson plans that include the objective and directions for the day. You can see how this is designed fo my Freak the Mighty Novel Study.

I also create a pacing guide for each novel study that helps you map out your long-range plan. You can see an example here from my Crenshaw Novel Study.
It’s a delicate balance to set the pacing. I generally try to aim for approximately 20 pages to read per day. This will be altered based on the chapter sizes. I don’t schedule split chapters as I feel this disrupts the reader. I know I hate to stop reading mid-chapter. That’s just mean!
 All of my novel studies offer a Google Drive™ format, in addition to the printable format, shown above, to use with your students. This allows you to use novel studies in a 1:1 classroom, save paper, and easily engage students that are absent. Here’s an example page from the Google Drive™ format of my Wishtree Novel Study. The same pacing would apply for the Google™ version as you would use for the printable version.
This pacing is a suggestion as it has worked for me, but it is very adaptable, so you can work to fit it into the schedule that you are working with. The planning pages are written for a whole class novel study, but can be easily adapted to fit small book groups or individual novel studies. How much teacher interaction you want to have during the course of the study is up to you and can be worked in with the suggested pacing.

Join me for part 4 of my series to learn how I add extra experiences to my novel studies for deeper learning and growth.
You can find my Freak the Mighty Novel Study, Crenshaw Novel Study, and Wishtree Novel Study that are mentioned above here in my store or at my TpT store. I also offer over 100 titles ranging from grades 1 to 8 where I am sure you’ll find something to engage your class in some deep reading.


To read Part 1: Comprehension

To read Part 2: Vocabulary
Are you interested in reading about and sharing ideas with other educators on using children’s literature in your classroom? My goal is to bring together teachers and homeschoolers who teach grades 3-8 and use novels with their students. I’d love for you to join me to learn, share, and grow together!
Click here or the image below to join my Facebook group, Book Talk with The Teaching Bank!


by Shelley | Google Classroom, Organization
Utilizing technology in classrooms today comes with numerous benefits, yet it’s not without its downsides like glitches and user frustrations. To support educators in leveraging available technology without the hassle of creating their own files, I offer my novel studies and social studies resources in both printable and Google Drive formats.
Given the novelty of these formats, I frequently receive technical queries from buyers. To address these common questions and offer guidance on customizing the files to suit specific requirements, I’ve crafted this blog post featuring answers to these inquiries and a tutorial on file manipulation.
How do I get the file into my Google Drive?
While each of my products includes an instruction guide, occasional issues may still arise. One common oversight is when teachers aren’t logged into their intended Google Drive account to store the purchased file. Clicking the link without being logged in often prompts a request for access, which shouldn’t be necessary after the purchase. Neither you nor your students should need to request access if the instructions have been followed correctly.
The solution typically involves ensuring proper login to your Google Drive before clicking the file link. Once logged in, you can seamlessly share the file via Google Classroom without any access requests needed.
To proceed, ensure you’re logged into your Google Drive and then click the link provided within your resource, resembling this:

A new tab will open with the force copy prompt.

The file will now be visible in your Google Drive account under the name “Copy of File Name.” You can conveniently modify this name to your preference by clicking directly into the name box and making the desired changes.

How can I assign individual chapters or activities to students instead of the whole file?
I aim to streamline and share this content as efficiently as possible. Each Google file I create has a unique link. To prevent confusion, I usually keep unit materials consolidated into a single file link or a few links for larger files divided into sections. This consolidation avoids overwhelming teachers with numerous individual links for chapters or activities.
Understanding the need for flexibility in tailoring materials to suit classroom requirements, I often receive inquiries about sharing specific sections—like a single chapter—with students. To assist in creating customized assignments from your master file, I’ve outlined straightforward steps below for quick customization to meet your specific needs.
Once your master file is in your Google Drive, follow these steps:


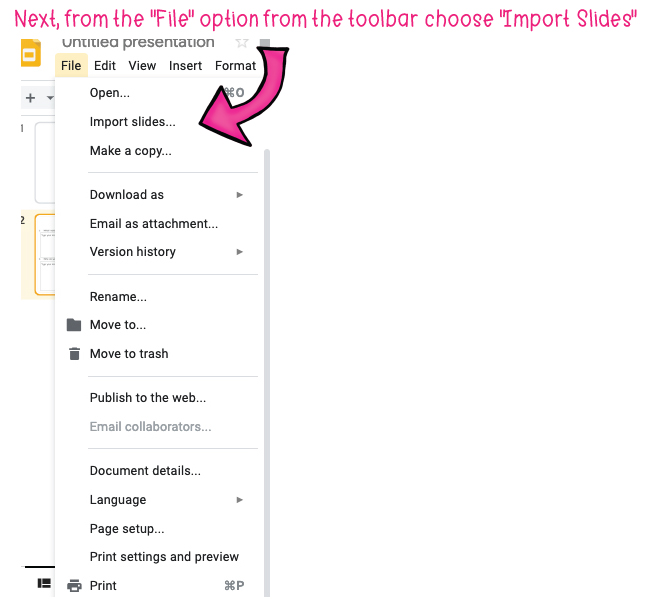


The dimensions mentioned earlier apply to all my novel study products. However, for social studies materials, sizes can vary, often set at 12×12. To ensure your file matches the right dimensions and avoids distortion, check the page setup of your master file.
I trust these details and suggestions will assist you in tailoring your files to suit your students’ and classroom’s specific needs. Should you have further queries or need clarification, please don’t hesitate to reach out—I’m more than happy to provide tips and clear up any confusion. You can find my email address on the initial page of every file downloaded from my store.

by Shelley | Organization
As the summer draws to a close and the start of a new school year lies ahead, it’s time to think about the challenging back-to-school season. Preparing for the return of students can be a daunting task, but with effective organizing strategies, teachers can set the stage for a successful and smooth transition.

Here are some essential tips and suggestions to help you organize for back to school, and create an environment that fosters learning, engagement, and growth.
- Create a Master To-Do List: Kickstart your back-to-school preparation by compiling a comprehensive to-do list. Divide it into categories such as classroom setup, curriculum planning, administrative tasks, and professional development. This list will serve as a roadmap to guide your efforts and ensure that no critical aspect of preparation is overlooked.
- Declutter and Deep Clean: Start the school year fresh by decluttering your classroom. Get rid of unnecessary materials and clean all surfaces, shelves, and storage areas.
- Designate Learning Areas: Create specific zones for various learning activities, like reading corners, writing centers, and science exploration stations.
- Organize Supplies: Arrange school supplies in labeled bins or drawers for easy access during lessons.
- Update Materials: Check teaching resources and update or replace outdated materials to keep the content fresh and engaging. Ensure your lesson plans align with your district’s requirements.
- Integrate Technology: Explore educational apps, online resources, and interactive tools to incorporate technology into your lessons effectively.
- Create a Yearly Calendar: Develop a yearly overview of key academic events, holidays, assessments, and deadlines to help you plan accordingly.

- Set Realistic Goals: Define achievable goals for yourself and your students. Break them down into smaller milestones to track progress effectively.
- Draft a Welcome Letter: Draft a warm and informative welcome letter to introduce yourself to parents and provide them with essential information about your classroom and contact details.
- Parent-Teacher Communication: Establish clear channels of communication with parents, such as email updates, a class website, or a communication app.
- Join Professional Communities: Connect with other educators in person or through online forums to share ideas, resources, and experiences.
- Prioritize Well-being: Remember that taking care of yourself is essential for being an effective teacher. Prioritize self-care, maintain a work-life balance, and avoid burnout.
- Set Boundaries: Establish clear boundaries between work and personal life. Avoid excessive after-hours work and dedicate time to hobbies and relaxation.
 Organizing for back-to-school is a crucial step in setting the tone for a successful academic year. By creating a comprehensive to-do list, organizing your classroom, refreshing your curriculum, managing time effectively, fostering parent-teacher communication, connecting with colleagues, and prioritizing self-care, you can ensure a smooth and successful start to the new school year.
Remember, a well-organized teacher creates an environment that encourages students to thrive and reach their full potential. Here’s to an exciting and productive academic year ahead!

by Shelley | Organization
 As spring blooms and the weather shifts, I’m sure many of us are itching to step outside. I can only imagine how restless students, confined indoors, must feel! Spring beckons us to venture out, experience the blossoming world—not merely observe it through a window. Nevertheless, school must go on. How do you engage students in learning when their attention drifts with the allure of the outdoors?
Head Outdoors: 
• Allow students to earn additional free time outside. Join in! Play a class game of kickball and get in there and play with them!

• Take the class outside and find a quiet spot for silent or read-aloud time. Some of my favorite teaching memories are sitting under the giant tree on the front lawn of the school and reading with my students.

Add more “get up and move activities” to your day.

These could include review games that allow the children to move.

Have students choose and set a goal for themselves to meet by the end of the school year to give them something individual to focus on and achieve.
Bring a focus on science by creating a community garden for your school.
 Based on the resources, especially over the summer, this could consist of spring annuals for beauty or possibly vegetables for nourishment if the resources allow for it.

Some great sites to help come up with outdoor class ideas can be found here:

A community space that they beautify gives the students a sense of pride that they are leaving a legacy behind at their school.
Before you know it, summer will arrive. In the meantime, take a moment to embrace the fragrance of spring flowers, revel in nature, and engage in playful activities with your class. It’s a great way to ease those restless spring fever symptoms for everyone.

by Shelley | Organization
I found an interesting article: How to Build a Better Teacher, by Elizabeth Green, that I thought was worth sharing.

The article talks about the myths and perceptions of what makes a great teacher. Are they natural born? Can it be learned?
The article gives five examples, taken from educational research that shows what sets apart a great teacher from a mediocre or bad one.

1. They can right a wrong: “The best teachers put themselves in their students’ shoes—and grapple with how they arrived at the wrong answer in order to set them right.”

2. They never say Shhh!”: “The best teachers eradicate ambiguity and respond to misbehavior with specificity, describing the desired behavior rather than the problem. “We’re following along in our books,” the teacher might say, gently reminding the distracted students to get back to work.”

3. They encourage deeper thinking: You will hear a lot of “why” or “explain how” type questions in these classrooms.

4. Great teachers “cold call” with a purpose: “The goal is to extract the maximum possible mileage from each question. By introducing the possibility that anyone can be asked to speak at any time, the teacher decreases the chances their students will tune out.”

5. They show more than they tell: “The teacher needs to be specific, showing students what detailed thinking looks like by illuminating the invisible mental steps that go into it.”

As I read I couldn’t help but compare myself and see my successes and shortcomings. This is a great article to think about as you navigate your school year. How do you measure up? What are you doing right? What can you improve to make this your most successful year yet?


